 Ben is taking graphic design and video, and is doing a great job with blogging project tutorials and reviews. Pay him a visit here: Whitney Designs.
Tuesday, December 15, 2015
Blog of the Week - Ben Whitney
The Blog Of The Week for this last week of the semester belongs to e-Comm sophomore, Ben Whitney. You may not know Ben by sight, but you would definitely recognize his voice as one of the talented readers of our daily announcements.
Ben is taking graphic design and video, and is doing a great job with blogging project tutorials and reviews. Pay him a visit here: Whitney Designs.
Ben is taking graphic design and video, and is doing a great job with blogging project tutorials and reviews. Pay him a visit here: Whitney Designs.
Monday, November 30, 2015
Make a Bio page!
Pages? We don't need no stinking pages!
 |
| Badges? We don't need no stinking badges! |
We will make a page for your Bio information, along with a handy link to it near the top of your blog.
Make a PAGE
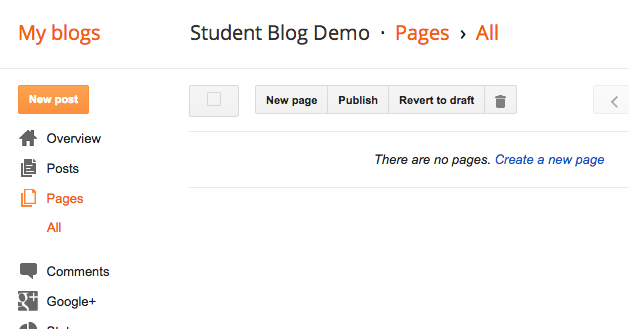 In your design menu, go to Pages, and then press the New page button at the top.
(This example was for something different.)
Add in the Content
Edit the page the same way you have been editing posts. This time, you need a photo (a semi professional one), a paragraph of bio info (you don't need as much as this example), and then your elevator pitch. (If you did not write your elevator pitch yet, the instructions are here.)
 |
| You only need 1 paragraph of bio info. Instead of Skills, copy&paste your elevator pitch in here! |

When finished, press the Publish button.
And... nothing happens.
That's because pages aren't blog posts - they come up by choosing them from a menu, as opposed to being displayed sequentially on your home page. So...
Add the Pages Gadget:


Page names are on the left, and will only appear in the menu if you have their boxes checked.
Once the pages are checked, you may reorder them on the right side. By convention, you should either place the Home page first or last.
(Yours will be Bio or About Me, instead of Graphics.)
Press Save when finished.


... in a gadget at the top, in which case it looks like either a menu bar or tabs.
If your gadget doesn't show up, try moving it to a different location.
Test out the link in your gadget to make sure it is working.
Revisit your page now and then to keep it updated!
Here's another quick reference from Blogger on some of the details of pages and the pages gadget that were not covered above: Blogger Buzz
Friday, October 2, 2015
The 5 Guarantees + 3 Superpowers
The 5 Guarantees
By now, e-Comm students can probably rattle off the 5 Guarantees of e-Communication:
Technical Skills, Communication, Leadership, Collaboration, and Project Management
Doing well in each of these areas not only prepares them for careers in their e-Comm focus areas (graphic design, web design, animation, video entertainment, convergence journalism, or sports information), but also many other fields! Sure, we hope to encourage students to go into careers in their e-Comm focus area, but sometimes students also develop other strong interests along their way through high school - or college - or adult life. Will a nurse, a business person, or a pastor benefit from having skills in those five areas? Most certainly!
The Plus Side of Having Multiple Interests
This TED video is precisely about those people that have more than one interest - "multipotentialites" - and the difficulties they face as they try to decide "what they want to be when they grow up". It turns out that "multipotentialites" may also have some unique advantages or "superpowers", bestowed upon them by virtue of their multiple interests or skills.So, for e-Comm students (and their parents) who aren't so sure that they will end up choosing an e-Comm-related career - it's OK! In addition to the 5 guarantees of e-Comm, you might also bring these superpowers to the table in whatever career(s) you find yourself:
Idea Synthesis, Rapid Learning, Adaptability
Here's why, along with a look at some successful "multipotentialites":
 Why some of us don't have one true calling - Emilie Wapnick
Friday, September 18, 2015
Create an HTML Gadget with links and images
Get the files
Head over to this post to get the 2 images you need for this gadget. Once you have them downloaded and saved then you are ready to continue!What are we doing?
We are going to create a new gadget (widget) for your blog. This gadget contains the HTML (the code behind web pages) needed to show the 2 images, along with links to our websites.Even though this will be a gadget, we are going to start out creating it in a post, where we will have more room to work, and where we will be able to upload the images.
Upload the images into a new post
 Create a new post on your blog.
Click the image icon (to the right of link), and upload the two images from the other post.
Make sure you click on each to get a blue border around them.

In the Compose view of your post, you'll see the two images.
DO NOT:
- drag the images
- right or left align the image
- add captions
- In fact, don't even click on them.
We now switch to HTML mode - and will stay there. Click the HTML button in the above left corner.
(Going back to Compose view and changing anything will cause Blogger to insert extra HTML or modify HTML - making your code look different than that shown in this tutorial.)
Remove the extra code
In HTML view - these are tags. HTML uses tags to set the structure of your page. Tags are enclosed inside a "less than" and a "greater than".
Carefully select and delete the "a" tags, leaving only the "img" tags as shown below. The "a" tag makes a link. In this case Blogger made each image a link to a bigger version of the image, which we don't want for the gadget.

Delete everything except the code shown below - yours should look just like this!:
 Now you should just have the two image (img) tags as shown above.
Add links
Stay in HTML view.
The "a" tag makes links.
Type in the "a" tags as shown here, three under the first image and three under the second. Also add in the "br" (break) tags as shown. Those are what makes the web browser go to the next line to display whatever is next.

The actual blank lines in the code above are only to make our code more readable - they won't show up in the browser.
Set image widths and floats
 Inside each image tag, after border="0", type a space and then add the parameters shown to set a width of 30% for the image, and to float it to the left. You must get all the punctuation just right, as shown. If there is a height declared, delete it.
Go up and click on the preview button, and you'll see something like this:

Now that each image floats left, whatever is on the page after it can come up to the right of it (wrap), when there is room.
The e floating left allows the links to come up next to it like we want, but it also made the raven to come up - which we will fix next.
 In HTML view, inside the br tags after the sets of 3 links, add in the style shown, like the first one shown here. Clearing makes the browser go below the floated image to place whatever comes next.
 Now hit the preview button again.


Add an image margin
 The links are appearing a little too close to the images, so in HTML view, and inside the quotes for the style in the image tags, add margin:6px;.
 Here's how your complete style attribute for the image tag should look now - along with the width.
And here's the complete image tag:

 Almost there!
Now if you Preview, it looks pretty good.
Round the sharp corners

Check it with Preview if you want.
Copy the HTML to a gadget
Your code now looks like this. If it does, select it all, and then copy it (command-c).
Save your post, but don't publish it.

 Go to edit the Design of your blog.
In that menu, choose Layout.

Find your sidebar, and click Add a Gadget.
 From the list of available gadgets (known on most blogging platforms as widgets), choose the HTML/JavaScript gadget.
Paste your code (command-v) into the Content window, and title the gadget.
Press the Save button.

 Your gadget should look something like this!
Your fonts, font sizes, and colors will be different than mine, depending on the template that you are using for your blog.
Clean it up
 Click the "tools" icon to edit your gadget.
 It will look better to make the links line up with the tops of the images, so select the br tag between the image and the first link, and delete it. Do this for both images. Save.

Add a br tag as shown, above the first image only.
Testing and done!
 Nice!
Nice!Test all 6 of your links to make sure they work. This blog gadget is public on the Web when we save it. It's embarrassing to hear from others that one or more of your links don't work. Test all of your links so that you will be the first to know - and then fix them!
If your sidebar is too narrow and the links don't fit well next to the images, you can try changing the width for the images - maybe down to 25% or even 20%.
Purposes of this tutorial
- It gives you a useful gadget for keeping up with what's going on in e-Comm and ONW.
- It hopefully gives you at least a fuzzy idea of HTML tags. You used 3 in this tutorial - the a tag to make a link, the img tag for an image, and the br tag to advance to the next line or insert a blank line. We didn't cover the "how" or "why" behind each tag, so don't worry if it seemed complicated or mysterious to you. When we make tags ourselves later on, they will be simpler - and we'll take them one piece at a time. For now, it is enough that you realize that things showing up on web pages are actually generated using HTML tags. Most of the time we have software generating the code for us, but we do need to know enough to look under the hood and tweak things when needed.
- The other purpose of this tutorial is to demonstrate one way to present a tutorial blog post. To see more examples, click the tutorial label (tag) in the label cloud (tag cloud) to the right.
To see how your tutorial blog posts are evaluated, go here.
Thursday, September 17, 2015
Images for the HTML Gadget Tutorial
Right-click on each image and SAVE/download for use in the HTML gadget tutorial.
After you've done that, you can find the tutorial here.


After you've done that, you can find the tutorial here.
Wednesday, May 20, 2015
Blogs of the Week!
Well, now - would you look at the calendar? Time flies during April and May at ONW! One of the casualties of the end-of-year craziness has been the eRavens blog. So today... it's a double feature, with 2 blogs of the week (er... month)! These nominees both come from the Entertainment Video focus area of e-Communication.
Tatty's blog (tattywilson.blogspot.com) was nominated because of her writing. Tatty is thorough in her explanations, but in a relaxed and friendly voice, which makes for pleasant reading. Tatty finds a good balance, writing professional and informative content in a style that lets little hints of her personality come through. Where else can you read a blog by someone with the unique perspectives of a roller derby player?
The other featured blog this week belongs to Will Cecil (thestoryofmoderation.com). Will's blog has a sleek modern design which draws your eyes to his featured stories and their images. Will has developed a writing style that lets his passion for film-making show through as he analyzes and describes films. Check out his post on Hitchcock's North By Northwest.
That's it for now. Feel free to blog over the summer, eRavens - not for an assignment. For fun. Seriously. If you see something that sparks your interest in the worlds of film, broadcasting, journalism, graphic design, photography, web design or animation, please share it and let us know what you think! When you've got cool stuff to show, or a story to tell - blog it!
Enjoy your summer break!
Tatty Wilson
 |
| Tatty Wilson -- tattywilson.blogspot.com |
Will Cecil
 |
| Will Cecil -- thestoryofmoderation.com/north-by-northwest |
That's it for now. Feel free to blog over the summer, eRavens - not for an assignment. For fun. Seriously. If you see something that sparks your interest in the worlds of film, broadcasting, journalism, graphic design, photography, web design or animation, please share it and let us know what you think! When you've got cool stuff to show, or a story to tell - blog it!
Enjoy your summer break!
Friday, April 10, 2015
Student Blog Of The Week - April 10, 2015
It's been a busy couple of weeks around e-Comm - with eMagine last weekend, and Sr. Endorsement Presentations coming up next week, as well as lots of planning for new cool things to unveil next year. Now that the dust is settling a bit, it's time to pick out a new Student Blog Of The Week.
This week's BOTW belongs to a sophomore in the Graphic Design and Animation focus areas - Greta Lundy.
Greta has taken the time to set up some of the things found in our to-do list for a better blog - including a custom banner with her logo, a custom favicon, and labelled posts so we can search her blog by topic.
She has nice examples of work to show, and the posts are formatted well.
However, what stands out the most is Greta's voice. Her sense of humor and personality come through in her writing, which is a good balance between a casual and a professional/informative tone.
Check out Greta's blog here: gmlundy.blogspot.com/
Congrats, Greta!
This week's BOTW belongs to a sophomore in the Graphic Design and Animation focus areas - Greta Lundy.
 |
| Greta Lundy - Animation & Graphic Design |
However, what stands out the most is Greta's voice. Her sense of humor and personality come through in her writing, which is a good balance between a casual and a professional/informative tone.
Check out Greta's blog here: gmlundy.blogspot.com/
Congrats, Greta!
Subscribe to:
Posts (Atom)