Thursday, February 26, 2015

Student Blog Of the Week

It's time for Blog Of the Week! Students chosen for Blog Of the Week are rocking their e-Comm blog/portfolio in all three areas of Content, Voice, and Presentation (as shown here: eravens.blogspot.com/2014/12/what-makes-good-blog-post.html)

This week, the honor for the second-ever e-Comm BOW (Blog Of the Week) goes to Anna Gaiche.  Anna is a sophomore, currently focusing on Animation and Video. Check out her blog post on a project:

agaiche.blogspot.com/2014/12/ice-cream-yum.html

e-Comm Student Blog Of the WeekAnna describes the project, tells us the process and what she learned, and has some good graphics.  Her voice successfully achieves that balance between professional/technical and friendly/casual.  Anna uses CARP well by having contrasting headings, and space between sections.

Great job, Anna!


Wednesday, February 25, 2015

How to add a logo to your Blogger banner

My Blogger template doesn't have an option for a header logo, whatever will I do?

Use this simple CSS "hack" to insert your logo in the background of the header!


Before:

So, here's the header for this blog - the way it looked without our logo.


Uploading the image:

Our logo had not been used in any posts up to this point, so we made a new post, clicked the button to add an image (right of the Link button) and uploaded it.  This logo is white, with a transparent background, so it doesn't show on the white post background you see here. (We then saved this post, but didn't publish it.)


Grabbing the image's URL:

We clicked on the HTML button to see the code.  Yeah, it looks scary, but don't worry - it won't hurt you.
We located the image tag (it has img in it) and selected and copied the url of the image that we fount between the quotes.


Locating the applicable CSS:


In another browser tab (using Firefox or Chrome), we selected everything in our header, and chose Inspect Element.


We clicked up the list of code statements on the left, until we found the one that had the blue header background in it - figuring that this would also be the section where we should put the background image.  Looks like this div is in a class called .header-outer.


Hacking the CSS!:

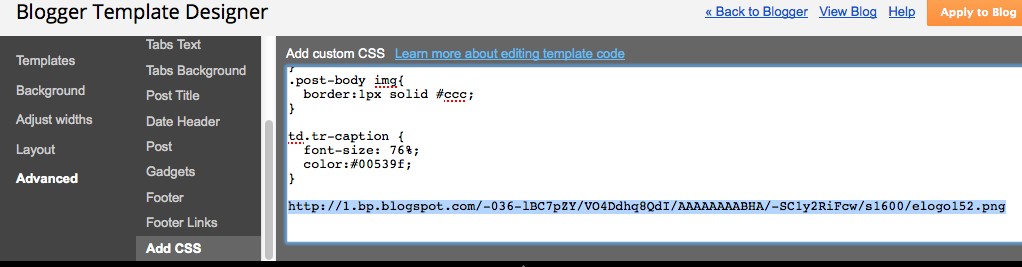
Back in the other tab, we did Design > Template > Customize, then Advanced > Add CSS.

We pasted the URL of the logo image that we copied a few steps ago, just to have it here.


In the other tab, back in the CSS showing at the lower-right, we copied the .header-outer part.


Then we pasted that in front of the logo's url - and added in the rest of the CSS you see here.  Don't forget the starting and closing braces.

You can experiment with the other CSS rules for background and padding - these are just the settings that worked for our particular blog template.  Yours will be different.


After:

Once the preview shows it looking the way we want, we press the orange Apply to Blog button, and there we go!


Do you have a request for a Blogger How-To tutorial?  Comment below to let us know!


Wednesday, February 18, 2015

e-Comm Blog Of the Week

e-Communication is starting a new feature on this blog and on eravens.net, Blog Of the Week! Mostly these will be chosen from our e-Comm students in any of the focus areas.

This week, the honor for the first ever e-Comm BOW (Blog Of the Week) is Madison Hartquist.  Madison is a senior, focusing on Graphic Design. Check out her nice post on illustration design:

Mad Designs:  Copying a Master: Illustration Design

In this post, Madison reviews the work of some of the masters in the field of illustration. She also includes a section on how their work has impacted her, complete with her own examples - and even a tutorial. Her post is nicely formatted and organized, making it easy to read and understand.

Nice work, Madison - and congrats!!


Want to be featured as a future Blog Of the Week?  Students are nominated by their e-Comm teachers, so wow them with your projects and blog posts!


Friday, February 6, 2015

What is CARP?

It's an easy-to-remember way to make everything you do look great!


Contrast 

Make things that are supposed to be different really different! Look at the Contrast heading compared to these two lines of text. Contrast can be of size, color, weight, typeface, and more. The main purpose of contrast is to draw the eye to the things on the page that matter most.

Alignment

Align text on the left or right (rarely centered). These four sections are left-aligned, and they also line up with each other.  Left or right aligned text looks cleaner, and is easier to read. Try to make every element on a page line up with something else.

Repetition

Repeating elements unify a design and establish rhythm. The formatting of these four sections is repeated over and over. Repetition uses patterns to create a cohesive theme and establish order.

Proximity

Things that go together logically should be grouped together visually. These explanations follow each heading closely, with space before the next one. Other ways to group things use boxes, bullets, shading, etc., but there is always space between the groups.

Your turn! 

Can you find all the ways that Contrast, Alignment, Repetition, and Proximity were used?