Get the files
Head over to this post to get the 2 images you need for this gadget. Once you have them downloaded and saved then you are ready to continue!What are we doing?
We are going to create a new gadget (widget) for your blog. This gadget contains the HTML (the code behind web pages) needed to show the 2 images, along with links to our websites.Even though this will be a gadget, we are going to start out creating it in a post, where we will have more room to work, and where we will be able to upload the images.
Upload the images into a new post
 Create a new post on your blog.
Click the image icon (to the right of link), and upload the two images from the other post.
Make sure you click on each to get a blue border around them.

In the Compose view of your post, you'll see the two images.
DO NOT:
- drag the images
- right or left align the image
- add captions
- In fact, don't even click on them.
We now switch to HTML mode - and will stay there. Click the HTML button in the above left corner.
(Going back to Compose view and changing anything will cause Blogger to insert extra HTML or modify HTML - making your code look different than that shown in this tutorial.)
Remove the extra code
In HTML view - these are tags. HTML uses tags to set the structure of your page. Tags are enclosed inside a "less than" and a "greater than".
Carefully select and delete the "a" tags, leaving only the "img" tags as shown below. The "a" tag makes a link. In this case Blogger made each image a link to a bigger version of the image, which we don't want for the gadget.

Delete everything except the code shown below - yours should look just like this!:
 Now you should just have the two image (img) tags as shown above.
Add links
Stay in HTML view.
The "a" tag makes links.
Type in the "a" tags as shown here, three under the first image and three under the second. Also add in the "br" (break) tags as shown. Those are what makes the web browser go to the next line to display whatever is next.

The actual blank lines in the code above are only to make our code more readable - they won't show up in the browser.
Set image widths and floats
 Inside each image tag, after border="0", type a space and then add the parameters shown to set a width of 30% for the image, and to float it to the left. You must get all the punctuation just right, as shown. If there is a height declared, delete it.
Go up and click on the preview button, and you'll see something like this:

Now that each image floats left, whatever is on the page after it can come up to the right of it (wrap), when there is room.
The e floating left allows the links to come up next to it like we want, but it also made the raven to come up - which we will fix next.
 In HTML view, inside the br tags after the sets of 3 links, add in the style shown, like the first one shown here. Clearing makes the browser go below the floated image to place whatever comes next.
 Now hit the preview button again.

Add an image margin
 The links are appearing a little too close to the images, so in HTML view, and inside the quotes for the style in the image tags, add margin:6px;.
 Here's how your complete style attribute for the image tag should look now - along with the width.
And here's the complete image tag:

 Almost there!
Now if you Preview, it looks pretty good.
Round the sharp corners

Check it with Preview if you want.
Copy the HTML to a gadget
Your code now looks like this. If it does, select it all, and then copy it (command-c).
Save your post, but don't publish it.

 Go to edit the Design of your blog.
In that menu, choose Layout.

Find your sidebar, and click Add a Gadget.
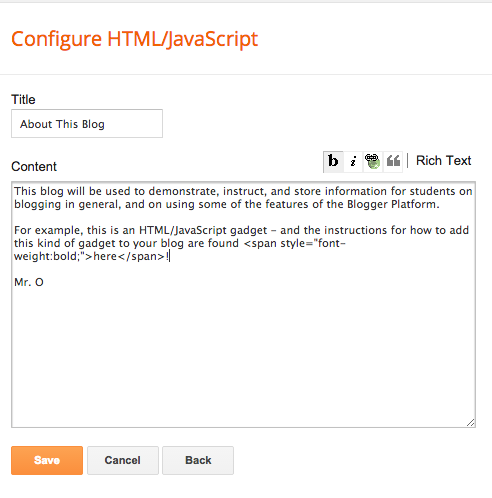
 From the list of available gadgets (known on most blogging platforms as widgets), choose the HTML/JavaScript gadget.
Paste your code (command-v) into the Content window, and title the gadget.
Press the Save button.

 Your gadget should look something like this!
Your fonts, font sizes, and colors will be different than mine, depending on the template that you are using for your blog.
Clean it up
 Click the "tools" icon to edit your gadget.
 It will look better to make the links line up with the tops of the images, so select the br tag between the image and the first link, and delete it. Do this for both images. Save.

Add a br tag as shown, above the first image only.
Testing and done!
 Nice!
Nice!Test all 6 of your links to make sure they work. This blog gadget is public on the Web when we save it. It's embarrassing to hear from others that one or more of your links don't work. Test all of your links so that you will be the first to know - and then fix them!
If your sidebar is too narrow and the links don't fit well next to the images, you can try changing the width for the images - maybe down to 25% or even 20%.
Purposes of this tutorial
- It gives you a useful gadget for keeping up with what's going on in e-Comm and ONW.
- It hopefully gives you at least a fuzzy idea of HTML tags. You used 3 in this tutorial - the a tag to make a link, the img tag for an image, and the br tag to advance to the next line or insert a blank line. We didn't cover the "how" or "why" behind each tag, so don't worry if it seemed complicated or mysterious to you. When we make tags ourselves later on, they will be simpler - and we'll take them one piece at a time. For now, it is enough that you realize that things showing up on web pages are actually generated using HTML tags. Most of the time we have software generating the code for us, but we do need to know enough to look under the hood and tweak things when needed.
- The other purpose of this tutorial is to demonstrate one way to present a tutorial blog post. To see more examples, click the tutorial label (tag) in the label cloud (tag cloud) to the right.
To see how your tutorial blog posts are evaluated, go here.